Toy Dump Truck Plans
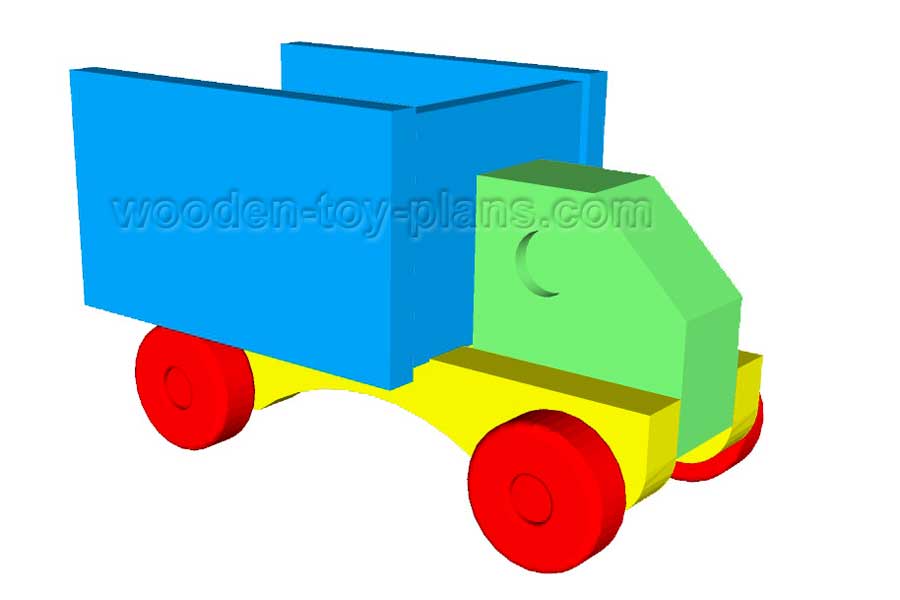
This really simple design makes it an ideal project for the beginner. This is an ideal scrap wood project - it can be made from one piece of 19mm thick stock 90mm wide and 450mm long.
The tipper part can be made up of a variety of boards including plywood, MDF or 12mm thick pine boards.
I made my own wooden toy wheels, but you can also buy them from eBay.
For the axles and the hinge pin for the tipper, I used 6mm dowel.
Since this page was first published, I made a few small changes to the design.
Tools
This toy can be made with a limited number of power tools. Safety is always the first consideration when dealing with such small pieces of timber.
Below is a list of some of the tools that I used to complete the project.
These links will take you to a page on Ebay where you can get an idea of what is available today.
A cordless drill, a jigsaw (sabre saw) and a scroll saw for cutting curves.
A tenon saw (back saw), and a hacksaw to cut wooden dowels.
Can you ever have enough clamps?
A combination square, wood file, sanding block with 120 and 80 grit sandpaper.
Selection of drill bits.
Here is how I made my own wooden wheels using a drill press and a circle cutter.
Nice to have but not essential is a 12 inch disc sander or a linisher.
A hot melt glue gun is useful in many ways, and it certainly helps to speed up the process.
Step by Step Instructions.
It's always a good idea to read through the instructions first. These are guidelines only, your level of experience will no doubt supersede these suggestions.
The parts are assembled in a manner that should allow time for the glue to set between each step.
Step 1
 Step 2
Cut out the parts that make up the tipper, shown as Part D Assembly in the drawings. This part can be made from any material you may have available, from 6mm MDF or plywood to 12mm pine boards.
Have a careful look at the toy dump truck plans, and note the drawings for the tipper are not full size, so it is best to refer to the dimensions.
The patterns for the rest of the toy dump truck are full size.
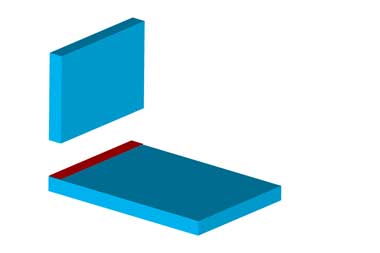
The floor and front of the tipper is glued up first, to form an L-shape as shown in the diagram below. Put it to one side to allow the glue to set.
Step 2
 Step 1
While the glue is setting, cut out the parts from 19mm (3/4”) stock as shown in the cutting diagram below.
Step 3
Laminate the parts that make up the cab and the hinge. Set them to one side to set.
Step 4
Clamping the two pieces that make up the chassis together and drill the 6mm diam holes as shown in the drawings. Use a drill press or a drill guide to ensure the holes are perpendicular.
Step 5
 Step 5
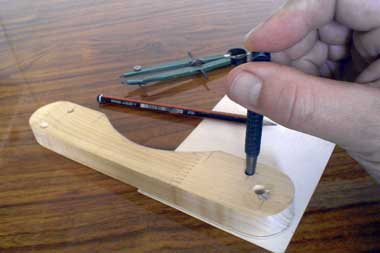
Making a template for the hinge pin. The tipper rotates around the rear end of the chassis, and the hinge block fits snugly against the rear axle. We want a fair amount of clearance here, so accuracy in make and fitting this part is quite important.
Using a piece of card as shown in the photo, mark out the holes using a centre punch or a thin pencil. Mark out the outline of the chassis as well.
Step 6
 Step 6
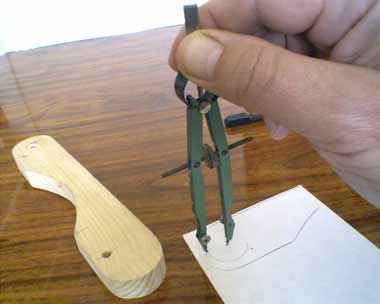
Using a compass, mark out a circle that will give clearance to the axle dowel.
Step 7
 Step 7
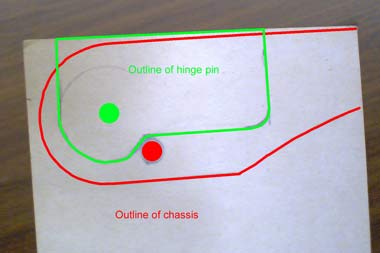
Photo of the paper template with the green line showing the outline of the hinge pin, and the red line showing the outline of the chassis.
Note how the hinge pin protrudes above the chassis. This is to allow the tipper enough room to sit flush on the chassis.
Step 8
 Step 8
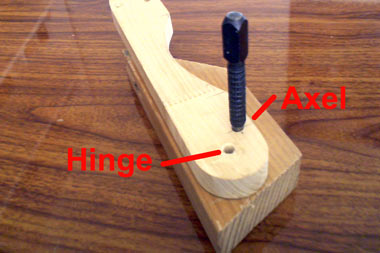
Mark the holes for the hinge pin.
Again, note how the hinge pin sits proud of the chassis.
Step 9
 Step 9
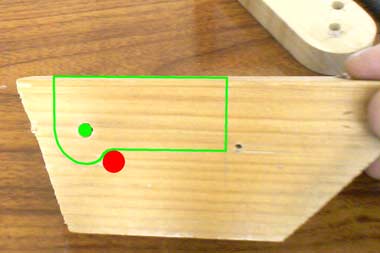
Drill the 6mm diam. hole (shown green) for the hinge pin, and a larger 8mm diam. hole shown red in the photo below.
Please note the position of this hole will determine the clearance of the rear axle when the tipper is resting along the chassis.
The round shape will allow the tipper to rotate, so is is important to get this just right.
Cut out the hinge pin using the paper template made earlier.
Step 10
 Step 10
Back to the tipper, if the glue has set enough to be handled.
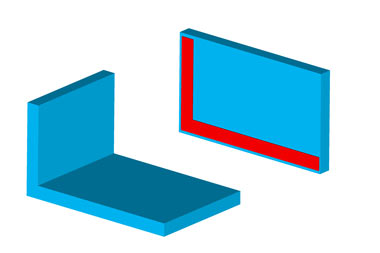
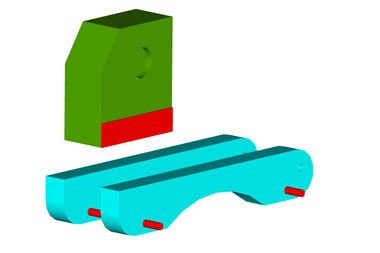
To complete the tipper part, the two sides are fixed in place as shown in the diagram below. Note position shaded allows for a shadow line along these edges.
Step 11
 Step 11
Finish the cab by sanding the end grain surfaces smooth. Drill the hole to represent the windows with a 22mm spade bit or Forstner bit.
Cut the two axle dowels to length, plus a fraction extra for a pair of plastic washers made from a plastic milk carton.
Mark the position of the chassis shown red in the drawing.
Glue the chassis parts to this line and using the axle dowels to hold the parts in position.
Step 12
 Step 12
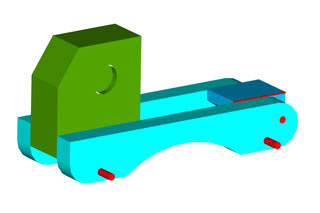
The diagram above shows the hinge pin in position. Sand the hinge pin to make it slightly thinner so that it will rotate freely. Make sure the hinge clears the rear axle.
Note the red line in the diagram showing the hinge pin sitting just above the chassis. This is to allow clearance for the tipper to rest along the back of the chassis.
Step 13
 Step 13
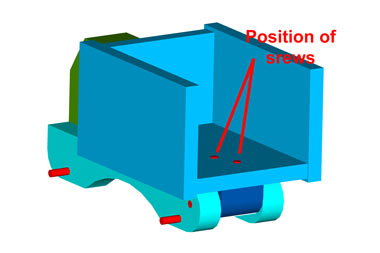
Time to attach the tipper to the hinge. With the hinge in position, place the tipper along the chassis with about 1mm clearance from the back of the cab.
Drill two holes to fit two screws as shown in the diagram below.
It is good practice in woodworking and carpentry to stagger the screws so that they do not follow the same grain. Do this in order to minimise the risk of splitting the wood.
These screws are used to clamp the tipper in position until the glue sets. You may prefer to remove the screws and replace them with a pair of dowels before finishing.
Test the action of the tipper and adjust accordingly before gluing the tipper in place.
Step 14
All that remains is to drill out the holes in the chassis for the axles with a 6.5 mm drill bit to allow the wheels to spin freely.
Make a set of plastic washers using a hollow punch and a plastic milk carton.
You could also rub a bit of candle wax along the axle to act as a lubricant.
Apply a dab of glue on each end of the axle to hold the wheels in place.
Round over all the edges with 80 grit sandpaper, give everything a final sanding with a finer grade of sandpaper, and the toy is ready for finishing of your choice.
Download Toy Dump Truck Plans
Download the free toy dump truck plans including step by step instructions.
Making Wooden Toy Wheels
For this toy dump truck, I made my own wheels using a circle cutter mounted in a drill press.
It may be easier to buy ready made toy wheels.
A selection of from Ebay. Includes wagon wheels, spoked wheels and wheels with treads.Ask me anything, share your project
Here you can ask me anything, share up to 4 photos of your projects.
Projects from all around the world
Click below to see contributions from other visitors to this page...
Are there full sized plans for all the parts of the MK-1 dump truck?
The download I have has the side of the truck and the lifter but none of the other parts listed in the instructions. Am I missing something?
The truck …
How to turn your hobby into a profitable business.
Solo Build It! (SBI!) is an online platform that empowers solopreneurs to build profitable online businesses. For over two decades, SBI! has been trusted by members to turn their passions, hobbies, or skills into successful ventures. Recently, the introduction of ChatGPT has ushered in a new era of AI-assisted content creation within SBI!.
Allow me to introduce you to Tai, your business-building AI assistant. Tai is now available in SBI! and can help you navigate the world of online entrepreneurship. Whether you’re a complete beginner or an experienced solopreneur, SBI! provides everything you need to create an income-generating website or blog.
Here are some reasons why starting an online business with SBI! and Tai is a great choice:
- Adaptable Lifestyle: Building an online business adapts to your desired lifestyle. Enjoy newfound freedom without being tied down to another job.
- Low Startup Costs: You don’t need significant capital to begin. All you require is a computer, internet access, a roadmap, and an affordable platform like SBI!.
- Flexibility: Work as much or as little as you want, wherever you choose. Once you’ve built a solid foundation, you can earn money even on days you don’t actively work.
- Portability: Take your business with you, especially if travel is part of your retirement dream.
- Global Impact: Help people worldwide by sharing your knowledge and expertise.
- Continuous Learning: Running an online business keeps your mind active and energized.
SBI! combines education, tools, and a proven process to give you the highest chance of achieving your financial goals. Whether you’re aiming for financial independence or simply want a rewarding project during retirement, SBI! can guide you.
If any of this resonates with you, I invite you to explore SBI! and discover how it can help you build your online retirement business. Even if you’re a beginner, SBI! provides the resources you need to succeed. Say hello to Tai and embark on your entrepreneurial journey! 🚀
Learn more and try Tai for free on the Solo Build It! website.
